Sunday, June 30, 2013

Provisioning JBoss Application Server as a RHQ bundle

** Click here to jump to references/introductions to terms and technologies **

Need for Application Provisioning

Rather than coming up with my interpretation of Application Provisioning and potentially not getting it quite right, I have decided to present it to you right from the JBoss Operations Network official documentation

Provisioning is a way that administrators can define and control applications, from development to production. The ultimate effect of the provisioning system is simplifying how applications are deployed. Administrators can control which versions of the same application are deployed to different resources, from different content sources, within the same application definition (the bundle definition). Resources can be reverted to different versions or jump ahead in deployment.

Obviously there is more detail provided in the documentation if you choose to read further. For now, we will next look at when you might use a RHQ bundle for provisioning.


When to use a RHQ Bundle for Provisioning ?

Without JON


You may choose to use a RHQ bundle for provisioning when :
  • You need portability of the bundle. Bundles come in as .zip files, a format that is well understood by various OS platforms
  • You have an application that can (or needs to) be deployed on mixed OS platforms
  • You have to externalize the deployment properties to a file that can be customized per destination at deploy time
  • You have (optional) pre-install and post-install tasks that you would like to execute on the destination before and after bundle deployment

With JON


In addition to all of the above reasons, one can use RHQ bundle with JON for following additional reasons:
  • You would like to deploy to a group of platforms at once
  • You would like to track the versions of bundles deployed thus far and have the ability to revert to any specific version at any time
  • You would like to be asked to provide values for the deployment properties prior to the deployment

Lets now take a look at the bundle I put together for our demo! The goal is to be able to provision the JBoss community Wildfly application server and start it post-deployment, all automatically.


Provisioning JBoss Application Server as a RHQ bundle

Setup

Follow the instructions step-by-step below to setup the bundle contents
  1. Go to Vijay's GitHub site here
  2. Click on Download ZIP and download the zip file. Unzip the file to an empty/clean folder of your choice
  3. While the browser window is pointing at the same site, read and execute the Pre-Installation Setup instructions in the Readme document
Following are images that show contents of the folder at various stages:

Extract from GitHub and initial unzip

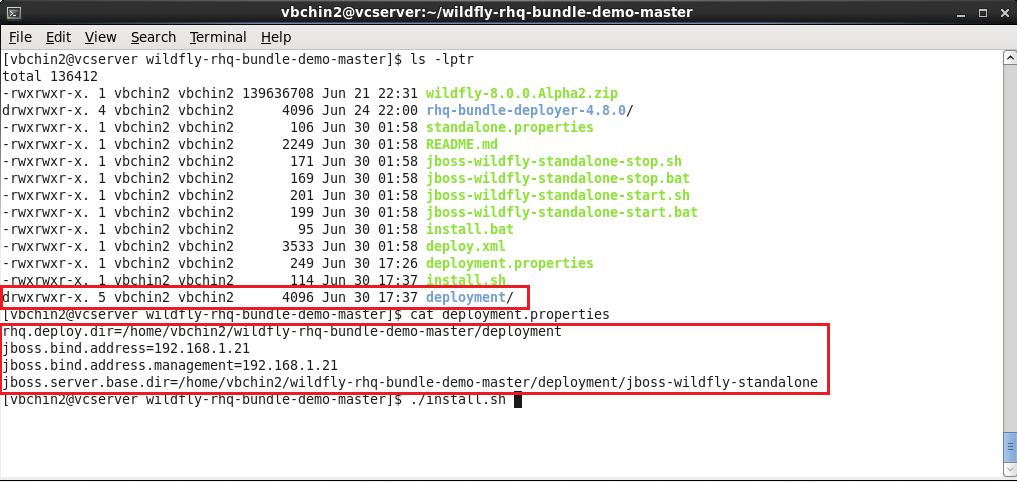
Folder snapshot post-completion of steps of "Pre-Installation Setup"

Command-Line Installation

Follow the instructions step-by-step below to deploy the from command-line:
  1. Go to Vijay's GitHub site here
  2. Read and execute the Command-Line Installation instructions in the Readme document
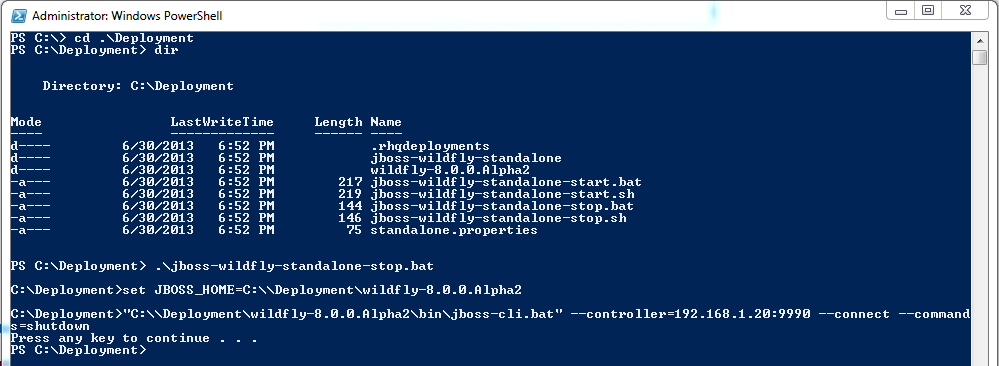
  3. If everything goes well, you should see the server start-up as shown in the image below
Following are snapshots of the folder and command execution:

Creating deployment destination and defining deploy-time properties

Checkout of app server post command-line installation

Bundle Installation via JBoss Operations Network


Follow the instructions step-by-step below to upload/deploy the bundle from JON:
  1. Package the working demo folder into in deployable RHQ bundle

    Creating the RHQ bundle (.zip) for deployment via JON

  2. Assuming you have JON installed, make sure you made groups of compatible platforms that are potential destinations (Inventory tab)

    Creating a group of compatible destinations

  3. Create a new bundle (Bundle tab) by clicking on the the New button at the bottom of the window in the center. Once the zip file is uploaded, click thru next screens that ends with clicking on a Finish button
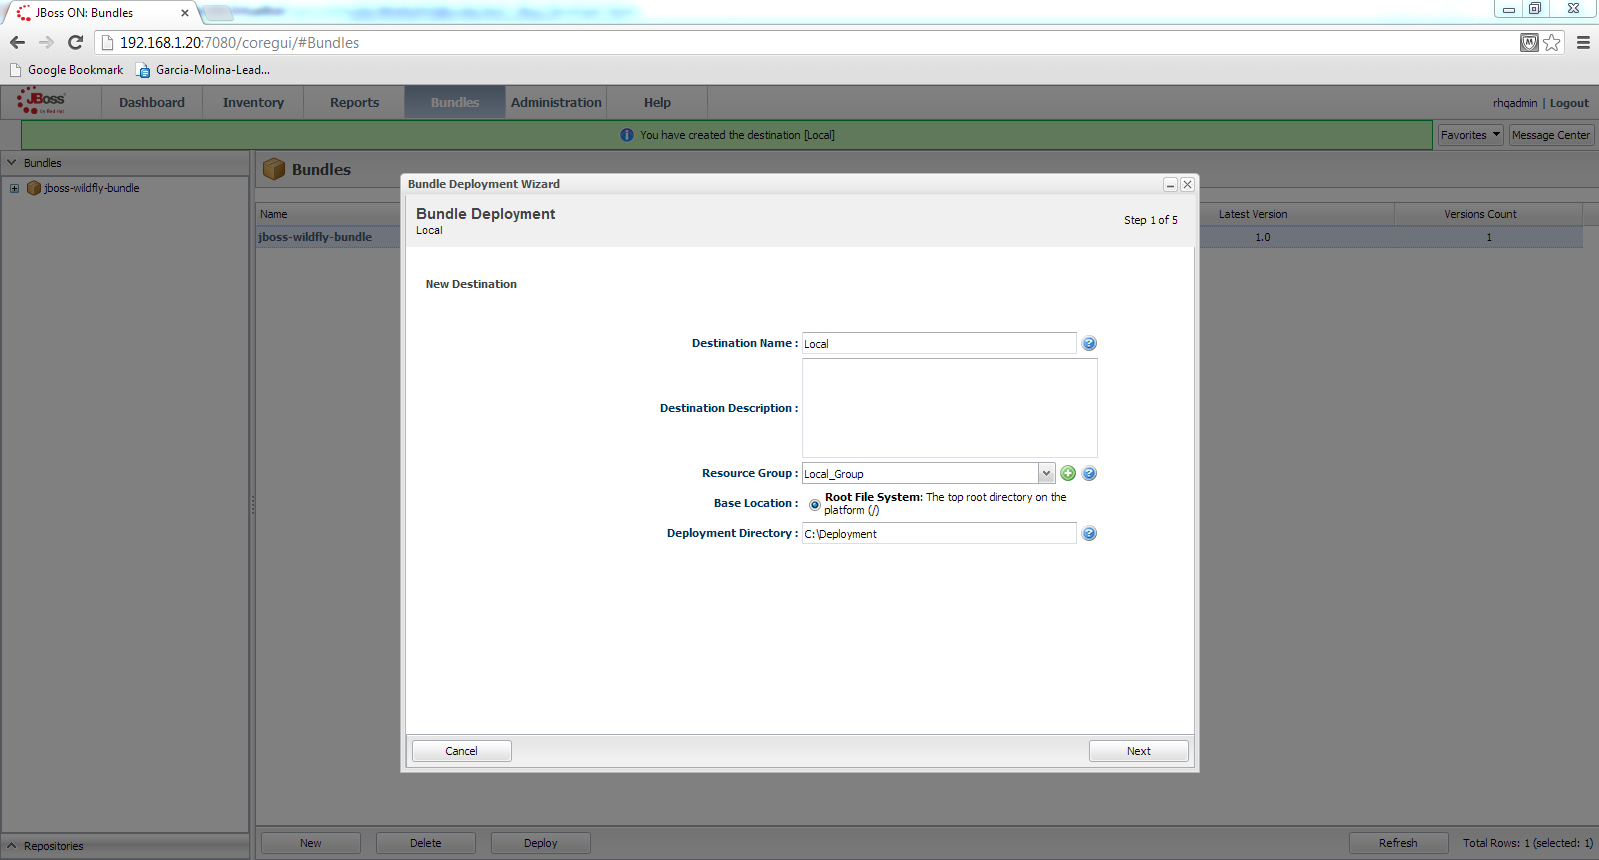
    Creation of a bundle in JON

  4. Select the bundle and click on Deploy button to start the deployment process. As a first step you would have to define a Destination, refer to the image below:

    Bundle Deployment - Assigning a Destination

  5. After choosing the default version of 1.0 in the next screen, move on to the screen where you need to fill in the deploy-time property values

    Bundle Deployment - Providing values for the deploy-time properties

  6. After successfully deploying the bundle on a platform (Windows) that is different from the platform (RHEL), verify both the destination deployment folder and the server start

    Folder snapshot post bundle deployment via JON - Windows Destination 

    Checkout of app server post bundle installation via JON

  7. Peek into JON for the view post-bundle deployment. To revert to a different version or to purge/delete the bundle from a destination you would click on one of the buttons shown in the image below

    Post-Bundle deployment view in JON

  8. To appreciate the value of the readymade scripts as part of the bundle deployment run the shutdown script as shown below and see the server shutdown

    Shutdown the server thru the ready-made shutdown script

References

Sunday, June 23, 2013

Ways of connecting to JBoss EAP/AS 7 using JMX


Prerequisites:

In this article we would assume that you have the latest installation/setup of :

  • JDK 1.7 - JAVA_HOME environment variable points to the installation
  • JBoss EAP 6 or AS7 installed - $EAP_HOME environment variable maps to the folder jboss-eap-6.X

Since I am using Windows, below is how the environment variables are configured on my system:

C:\>echo %JAVA_HOME%
C:\Java\jdk1.7.0_25

C:\>echo %EAP_HOME%
C:\EAP-6.1.0\jboss-eap-6.1

For the sake of simplicity we would also assume that you have started the out-of-the-box EAP/AS server in standalone mode

C:\Users\VijayBhaskar>cd %EAP_HOME%
C:\EAP-6.1.0\jboss-eap-6.1>cd bin
C:\EAP-6.1.0\jboss-eap-6.1\bin>standalone.bat

If the link http://localhost:9990 brings up a login window we are ready to go ...


Using JBoss EAP/AS provided JConsole

The EAP/AS packaged JConsole lets us use all the features of the JDK provided JConsole and in addition you will be provided the JBoss CLI (Command Line Interface) as the last tab of the console to manipulate the runtime settings of the server. So, follow the instructions below to be access the JBoss CLI as well thru JConsole.

===Note ===

For this to work correctly ensure the following:
  • There aren't any spaces in the path pointed to by the JAVA_HOME variable, as this variable is later used in the script jconsole.bat in the lines containing %EAP_HOME%\bin
  • When using jconsole locally, I had previously run into a situation when the server was started as SYSTEM user and opening the JConsole as any other user wouldn't list the JBoss Server process and its PID. "Both JConsole and the application must by executed by the same user. The management and monitoring system uses the operating system's file permissions", according to official documentation of JConsole.

Open up the JConsole provided with the EAP/AS installation as shown below

C:\>cd %EAP_HOME%\bin 
C:\EAP-6.1.0\jboss-eap-6.1\bin>jconsole.bat

Local Process Connection - Simplest Way

The simplest way to get into the guts of the JBoss server's MBeanServer is to select the Local Process in the New Connection window and double-click on the line item that starts with jboss-modules. You would go for this option if you are logged on the machine running the standalone server

EAP/AS provided jconsole window

Remote Process Connection - The Other Way

The other way to to provide a URL for the remote process of the form: service:jmx:remoting-jmx://{host_name}:{port}.

You would choose this option if the server was started on a remote machine such that the management port binds to the remote IP (that is pingable from the machine where you are running JConsole from).

You may use the command : telnet IP PORT to verify reachability from the host running JConsole .

In the example below the management port of the remote server is bound to the IP address: 192.168.1.20

C:\EAP-6.1.0\jboss-eap-6.1\bin>standalone.bat --server-config=standalone-full-ha.xml -b 192.168.1.20 -Djboss.bind.address.management=192.168.1.20

The following image displays such a usage:


Using the Oracle JDK provided JConsole/JVisualVM


Oracle JDK provided JConsole

The behavior of directly using jconsole.exe provided by Oracle JDK, is very similar to its working described above when used with wrapper jconsole.bat.

Since we are not adding additional JBoss specific JARs to the classpath before launching it:

  • You can connect to the server's MBeans only when the jconsole.exe is run on the same physical host as that of the standalone server
  • We miss the JBoss CLI functionality. You can rely on the jboss-as mbeans exposed in the last tab for many of the attributes/operations you might be interested in executing against the server.

C:\>cd %JAVA_HOME%\bin
C:\Java\jdk1.7.0_25\bin>jconsole.exe

Oracle JDK provided jvisualvm

The behavior of Oracle's jvisualvm is similar to jconsole's when used directly and without adding the jars required by the remoting-jmx to the classpath. That is:

  • To be able to connect to server's MBeans it has to run local to the server
  • No JBoss CLI functionality

If however, there is an existing JBoss EAP/AS installation we could leverage it and make JMX connections :

  • Locally and Remotely
  • With JBoss CLI functionality
Follow the steps listed below to be able to execute jvisualvm.exe and use the remoting-jmx functionality supported by JBoss to connect remotely:

  1. Copy the jconsole.bat in the %EAP_HOME%\bin into the same folder and call it jvisualvm.bat
  2. Edit the line that launches jconsole.exe and rename it jvisualvm.exe, as shown below
    // Before 
    "%JAVA_HOME%\bin\jconsole.exe" -J"-Djava.class.path=%CLASSPATH%"
    
    // After
    "%JAVA_HOME%\bin\jvisualvm.exe" "-cp:a" "%CLASSPATH%"
    
  3. Run the batch file jvisualvm.bat at command prompt
  4. Right click on the Remote and add the remote IP and optionally give it a name
  5. Now right-click on the new entry under Remote and choose Add JMX Connection
  6. In the new dialog box provide the connection in the form: service:jmx:remoting-jmx://{host_name}:{port}
  7. Before choosing Ok, provide the username and password for the connection as the remote JMX connection is secure by default

Following images should help with running jvisualvm:

Adding a remote host to jvisualvm
Adding a VM to monitor on the host
Properties of remote VM when connected

References:

  1. Using JConsole to connect to JMX on AS7
  2. Connecting VisualVM with a remote JBoss AS 7 / EAP6 JVM process